Version 2.0 is out now here but I’ll leave this first version here for all that are interested.
If you’re interested in modifying this project to suit your personal or business needs, why not hire me by emailing me at patrick@odonodesign.com
Why Use PIC Assembly Instead of Arduino/ESP32?
Most examples online use high-level microcontrollers.
This project is different — it’s built for speed, reliability and precision.
✔ No operating system
✔ No Arduino bloat
✔ Cycle-perfect timing
✔ Ultra-low power
✔ Microsecond-level accuracy
✔ Starts instantly
✔ Production-grade reliability
The schematic and parts list for this project is free below, but for the assembly code to make it all work I do ask for a small fee to download it instantly here or here on Etsy. This is to help support me and keep the blog running.
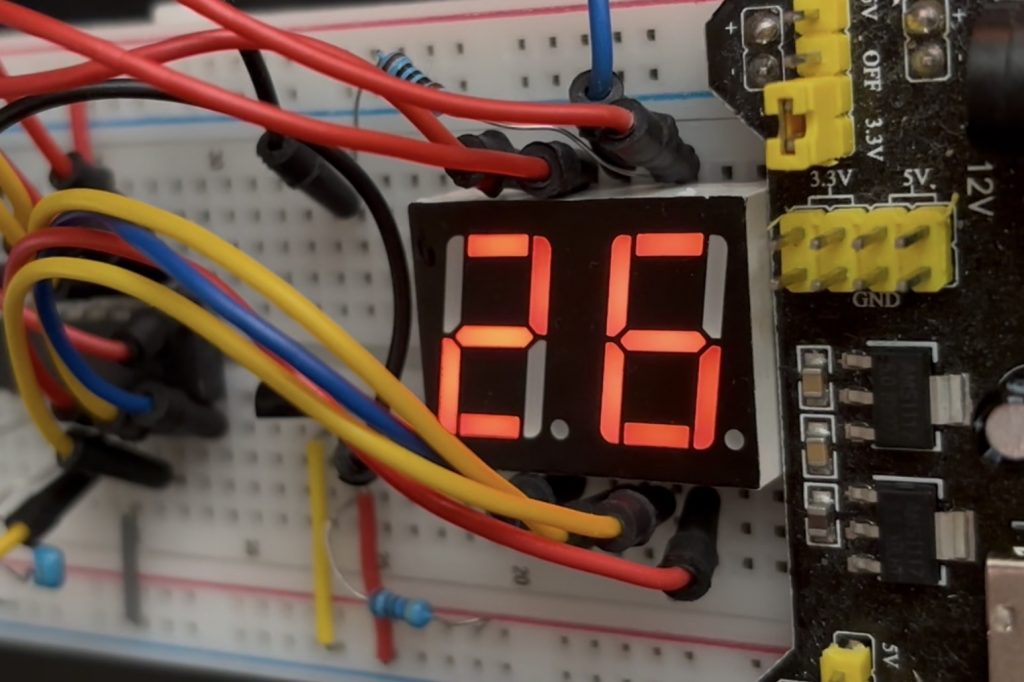
What does this project do? This digital thermistor will display the current temperature between 0-99° Celsius (centigrade). The display is beautifully multiplexed using just I/O pins. All written in assembly language for mplab (mpasm) 8.92 or earlier on windows (the beautiful version when mplab was at its greatest before the launch of the horrid mplab x).
Disclaimer Notice: This is an educational tutorial only and I will not accept any responsibility for damage or harm to property and/or persons as a result of you following and building this tutorial project. You are responsible for your own safety and performing any safety tests if used commercially. Ideally we recommend this for use only in personal/hobby projects.
The PIC16F628 is a fantastic versatile chip. It’s low cost and is tonnes cheaper than Arduino.
Use this assembly code to flash the PIC16F628 chip, any programer will do. Then build the circuit per the schematic and parts list below, switch it on and hey presto!
Components needed:
You can buy most of these from AliExpress, Amazon or eBay for pennies:
- PIC16F628 04/P (ensure its the 4 Mhz version, denoted by the 04/P)
- Dual 7 Segment Display (common anode). Not common cathode.
- DS18B20 (also on Amazon)
- 0.1uF ceramic capacitor, 2 x 470ohm, 4.7k ohm, and 10k ohm resistors
And that’s it!
Hardware Schematic
Just look how lean this hardware is, minimum components used. Here in the schematic but it also can be used as the finished pcb layout if tweaked slightly:
Fig:1

Fig:2
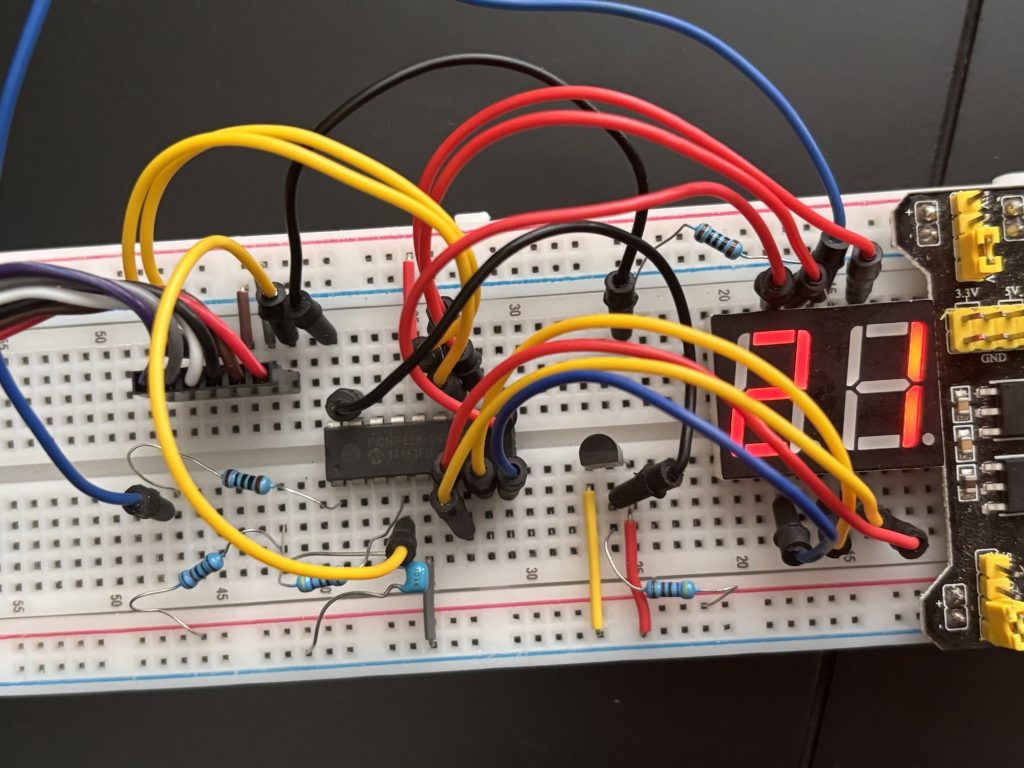
Fig 2 shows the schematic laid out on a breadboard. The blue device on the right is simply a power supply of 5 volts but you can use your own.
3. CODE TIME: flash with the assembly code (download it instantly here). If you want to modify it just follow the comments in code or reach out to me for assistance at patrick@odonodesign.com
Power up the circuit, and there you go, the project is complete! Place it its final location and watch it monitor the temperature!
Enjoy!
This is an educational tutorial only, but if you want to use it commercially, you must ensure you conduct the appropriate safety tests for your market. But as an example, uses for this could include:
Industrial systems, consumer products, systems which are sensitive thermally, thermostatic controls, and thermometers, monitor various environments and machinery, power plants, and manufacturing, weather stations and home automation systems, measure temperature in solids, liquids or gases, Laboratories, Diagnostic labs, Dairy Industries, Domestic or industrial refrigerator temperature monitoring, baby thermometer, HVAC, automotive, research and quality control, adult thermometer, room temperature monitoring, outside temperature logger, industrial and consumer goods/products, wireless temperature monitor, LCD/LED screen thermometer, temperature logger, farming, agriculture, office, home, manufactured goods, electronics engineering, embedded systems, integrated products, digital products, physical products, projects, end products, consumer goods, pcb design, printed circuit boards, plastic enclosures, remote temperature monitoring, motors, surface plates, home appliances, computers, industrial equipment, warning electrical radiators, exhaust gas monitoring on cars, food production, 3d printed chocolates, alcohol breathalyser, transit, hvac, power and utilities, calibration instrumentation, heat exchangers, heating cooling systems, energy, red sensor, etc thermistor, rtd sensors,
PIC16F628 assembly PIC assembly language tutorial PIC microcontroller vs Arduino PIC vs ESP32 DS18B20 PIC code 1-Wire protocol PIC PIC16F628 thermometer project PIC assembly firmware PIC microcontroller efficiency Why use PIC microcontrollers
cycle-accurate timing deterministic microcontroller code low-level embedded programming bare-metal programming PIC 1-Wire timing accuracy microcontroller power consumption interrupt-driven temperature reading embedded systems optimisation minimal instruction cycles lightweight firmware design
Arduino overhead Arduino timing limitations ESP32 FreeRTOS overhead Arduino digitalWrite speed ESP32 latency issues microcontroller bloatware embedded systems performance comparison
“How to read a DS18B20 temperature sensor using PIC assembly” “Why PIC assembly is more efficient than Arduino” “PIC16F628 temperature sensor project with code” “Best microcontroller for simple temperature projects” “Cycle accurate 1-Wire code for PIC microcontrollers” “How to bit-bang 1-Wire in PIC assembly” “PIC16F628 DS18B20 wiring and schematic” “Minimalist microcontroller temperature monitor” “Bare metal programming vs Arduino libraries” “Why my Arduino DS18B20 readings are unstable” “Optimised DS18B20 firmware for 20 MHz PIC” “How to create a reliable digital thermometer without Arduino” “Understanding PIC assembly timing for sensors”
Domestic Purpose, Check the temperature of the water before bathing, to check the temperature of food items for cooking, to measure the temperature of grill stands, ovens, and other heating appliances.
Laboratory Purpose
To check the temperature of a solution.
To check the room temperature or atmospheric temperature to carry out experiments.
Industrial Purpose
To measure the temperature of the inner and outer surfaces of the walls.
Food industries use them to monitor the temperature of food items during various stages of preparation. Especially in the baking and cooking industries, they are very useful. By taking the right temperature, it is possible to achieve the desired temperature where the microorganisms do not multiply.
© Copywrite ODONO DESIGN 2023
DISCLAIMER
This is an untested project. This is for hobby and personal use only. We do not allow commercial use of this tutorial (ie selling it in an end product, but if you are making this for commercial purposes, YOU are responsible for all CE, FCC and safety testing according to your jurisdiction. We will not be held responsible for any fire, damage or injury caused by this project.
COPYRIGHT AND TERMS OF USAGE (LISCENSE)
You are free to use this file for personal, hobby or educational purposes only. No commercial use of this project is permitted. None of the content on this webpage (code and hardware designs) may be plagiarised to other websites. Failure to comply will result in legal action. Thank you.
This webpage is Copyright by Patrick O’Donoghue 2024. Temperature Monitor by Patrick O’Donoghue is licensed under CC BY-NC-ND 4.0
Leave a Reply